Lack of communication in relationships

I would like to change the topic from food and venture into something piercing, which all of us have gone through or unknowingly subjected someone else to, i.e lack of communication among relationships.

This is a growing concern as a by product of technology, which definitely helps us stay connected, but at the same time, we lose the essence required for a relationship to be sustainable. They have become as fragile as you seeing a birthday reminder, and wishing them because you are supposed to.

Unfortunately the similar fragility is being extended to our kith and kin. You have tried your level best to sustain and nurture relationships, especially those that you grew up with, or formed at a later stage in your adulthood. The ones that cause a lot of pain are the ones, that you grew up with and wondered what has changed so much that we don’t communicate at all. No matter what you do, your overtures are not responded. Hence it’s time to make yourself the priority, and let go of something not worth being valued, which in itself is a liberating feeling.

My appeal to all of you is that to be courteous enough to respond in a way that you care. Introvert, extrovert or ambivert – whatever you are, responding to someone who makes an effort to maintain the relationship doesn’t require too much effort, especially in today’s world. Yet you chose to ignore or be ignored. Atleast communicate what your issue is or why you have drifted apart as Kith and kin. It maybe too late and the one making an effort may cease to do so because relationships are not a one way traffic. They need to be nurtured with love and not taken for granted with ignorance. Whether you want them in your life or not, you are the master of your decisions and actions, and only you can make a difference if you want someone’s presence in your life.

Palak curry

I love this green bunch of goodness. Popular as an inseparable combo with paneer, it tastes delightful even without as well. This is my Mom’s recipe, always enjoyed with chapathis.

INGREDIENTS

1. Fresh palak leaves – a bunch

2. Ginger garlic paste – 1tbspn (freshly made)

3. Onions – 2 medium or 1 large

4. Cumin seeds – 1/2 tsp

5. Turmeric – a pinch

6. Garam masla powder – 1/2 tsp

7. Green chillies – 2 or 3

8. Chilly powder – 1/2 tsp

9. Salt – as required

1) Blanch the palak leaves ( bring it to a boil). And then transfer them to cold water. And after sometime, grind it to a paste.

2) Grind ginger garlic (fresh and no ready made paste) onions green chillies into a fine paste.

3) Heat oil. Add cumin seeds. When they splutter add, the ground masala and fry for 8-10 minutes. Then add a pinch of turmeric, a little garam masala powder and if you feel the spice is less, add little chilly powder. After sauting well, add the palak, add the ground palak and saute till the rawness disappears. Add water if required to adjust the consistency.

Recipe credits : Mom 😍

VEGETABLE PULAV

I love this recipe of Mom since childhood. Whenever she prepared this, it was a feast for me. I relished every bite and still continue to do so, when I now have learnt to prepare it. Its not very tedious and its really tasty!

VEGETABLE PULAV

VEGETABLE PULAV

INGREDIENTS

BASMATI RICE – 1 CUP

ONIONS – 3-4 big ones

TOMATO – 1 medium sized

GINGER GARLIC PASTE ( freshly made from around 10 flakes of garlic and half an inch piece of ginger)

GREEN CHILLY – 1 or 2 depending upon the spice

KASURI METHI – a pinch

CORIANDER LEAVES – few strands

GARAM MASALA POWDER – 1.5 tsp

TURMERIC POWDER – A pinch

CHILLY POWDER – half a spoon

BOILED VEGGIES – I used carrots, beans, paneer (optional), soyachunks (optional)

CASHEWNUTS – 5-7 (chopped/OPTIONAL)

GHEE/OIL (I used a combo of both, predminantly ghee)

PROCEDURE

  1. Wash and soak the basmati rice for 10 minutes. Drain the water and let the rice aside for 10 minutes.
  2. Heat a spoon of ghee and fry the basmati rice for two minutes.
  3. Simulataneously heat water ( double the quantity of rice – 2 glasses)
  4. Add the rice to the boiling water and transfer the vessel to a cooker, and pressure cook for 4 whistles on high flame. Remove the vessel containing rice once the cooker cools down and allow the rice to cool down.
  5. Heat oil/ghee in a pan. Add kasuri methi, chopped green chillies and roast for a while. Add sliced onions and fry till brown. Add ginger garlic paste. When the aroma arises add the powders and fry for 2 minutes till the rawness evades.
  6. Add finely chopped tomatoes and fry for another 5-7 minutes. Add chopped cashewnuts and chopped coriander leaves and fry for a while. Also add the veggies and mix thoroughly.
  7. Add the boiled and cooled basmati rice to the above mixture and keep mixing till rice is coated with an uniform colour of the masala.
  8. Serve with cucumber and onion raita.

VELLAPPAM AND STEW

Vellappam and stew, is an ideal breakfast item! Powerpacked too!!!! It has its origin from Kerala. And I never heard about it till I got married. When I saw it first, the vellappam s looked awesome like the sun you draw in cartoons. But the stew was nt very appealing to me, as I detested white gravies thinking they don’t taste good. I was sooooo blissfully unaware how appealing to the tastebuds the stew is. There is an amchi dish called Valval, which I hated as a kid. Again….. just because its white, I did nt even taste it. Until recently, when I got hooked to it, I realized what I had been missing all these years.


                                       final

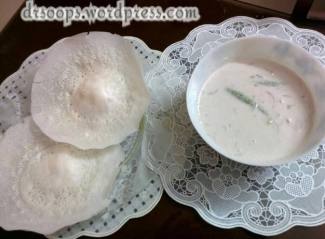
So the same followed with the stew. I used to have vellappams with pickle or chutney. Until by mistake, someone accidentally served it to me. And thats when I had the first bite of the vellappam with the delicious stew. A vellappam is incomplete without stew in the same way, idli is incomplete without sambhar. So here I present the mouthwatering Kerala dish, for whom I am thankful to the people of God’s own country. I learnt this dish from my Mother-in-law. And now, my Mom makes it too :-). Its not spicy and hence a big hit with kids. The beautiful vellappams are inviting too. My little girl relishes them.


INGREDIENTS

VELLAPPAM

1 cup    – White rice ( my cup/measure is usually a drinking tumbler measuring 175 ml).

1/4 cup – Cooked white rice

Coconut milk extracted from half of one half of a coconut. When you break a coconut, you get 2 halves. So half of one half of a coconut. If the coconut is very small, you can use entire one half. I ve used thick extract to make the batter. I got coconut milk of around 3/4th cup. I have refrigerated the thin extract just in case I might require it to add to the batter to get the required consistency.

DRY YEAST – 1/2 a teaspoon

SUGAR – 1/2 a teaspoon
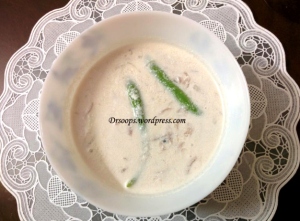
STEW

COCONUT MILK – extracted from 1 coconut

POTATOES – 1 Chopped in squares

ONIONS – 2 sliced

CINNAMON – a tiny one, probably a cm long

CLOVE – just one

GREEN CHILLY – 1 OR 2

PROCEDURE

VELLAPPAM

1. Grind the rice, cooked rice with coconut milk. Do not add entire quantity of coconut milk at once. In that case, the end result will be course. What we require is a smooth fine paste. So keep adding it little by little. Grind it with the thick extract. Keep aside or refrigerate the thin extract

2. The batter should nt be as thick as an Urad based dosa, nor as thin as a neerdosa. It should be of pourable consistency.

3. Mix half a teaspoon of yeast in two tablespoon lukewarm water. Yes I repeat it again. LUKEWARM water! If the water is very hot, the yeast won’t survive. Add the same quantity of sugar as the yeast, half a teaspoon. Keep it covered for 15 minutes.

step1

4. Add the mixture to the batter and keep it overnight for fermentation.

step2

STEW

1. Extract thick as well as thin coconut milk.

2. Boil the onions and potatoes in the thin extract. Cover the pan so that the potatoes get cooked.

3. Add cinnamon, clove, salt and green chilly and bring to a boil. Add the thick extract and do not boil for a long time after the addition.

stew

HOW TO MAKE VELLAPPAMS

When I first saw Vellappam, I wondered how laborious a task it might be until I saw my Mother-in-law making them. It is actually fun making them. Simple and easy. I was impressed. All you need is a nonstick and yes, no oil required.

1. You need a nonstick appam pan. Just heat it. You get an appam pan, just for making these yummies. Its not a flat pan, Its kind of spherical where the batter you pour gets collected in the center.

2. When sufficiently heated, pour a ladleful in the center of the pan. Hold the pan on the sides and just swirl till the batter conforms to the pan like a circle.

step3

3. When you keep the pan back in the flame, the batter again gets collected in the center and the edges are thin. Now that explains why these beauties are thick in the center and thin at the periphery.

4. Cover and cook. Open the lid and just prick the centre with a fork to check its cooked.

Serve this with stew and I am sure all of you will love it.

P.S: This post has been featured in my dear friend, Shwetha Amit Pai’s blog as a guest post. It was her who also edited my pictures 🙂 shwetssizzlingwok.wordpress.com

FISH PANNAUPKARI (Spicy and tangy fish in onion based gravy)

Pannaupkari…… Aaah.. the name itself makes us drool. This is a hot favourite Amchi dish. This is prepared by roasting finely chopped onions till brown, along with addition of chilli powder and tamarind extract. The beauty of this dish lies in how well one can saute the onions till perfection. Yes, it is time consuming and a test of your patience. This dish requires a certain level of skill, which I managed acquire recently. This is best made with coconut oil to give that extra hint of flavour. No celebration at home is complete without this authentic delicious dish. The tangy as well as spicy flavour is sure to get you asking for more.

IMG_20140701_185803~2_wm_wm

RECIPE

INGREDIENTS

Fish – Mackerel (Ranju), Lady fish (Kane), Anjal (King Fish)

I ve used 12 medium sized curry pieces.

ONION – 3 large (finely chopped)

COCONUT OIL – 12 teaspoons

CHILLY POWDER – 2 1/2 – 3 teaspoons depending upon the spice

Well, you get parekal chilli powder (the spicier one) and Kumte chilli powder(less spicy but imparts a beautiful red colour to the gravy) separately . So I added 2.5 tea spoons of Kumte and one spoon of parekal. And if in case you do not get them separately, no issues. You can add three teaspoons of any store brought chilli powder. And if you can even adjust as per your taste.

TAMARIND EXTRACT – made from a lemon sized pulp of tamarind

PATIENCE!!!! – Oodles!!! ( This is by far, the most important ingredient here.)

PROCEDURE

1. Heat oil. Saute onions in the oil until they turn brown. This step is very much time consuming, roughly 25- 30 minutes. Take care that you do not burn the onions. The out come will be bitter then.

2. Add chilly powder. This is a little challenging for beginners. You should roast just enough for the rawness of the chilly powder to evade. Be careful not to over roast. Roast it for about a minute

3. Then add tamarind extract and required quantity of water and bring it to a boil.

4. Add fish and salt. Cover and cook till done.

5. Fish does not require much of cooking. When you can see steam oozing through the periphery of the covered plate, you know its done!

I hope you enjoy this dish as much as I loved making and blogging about it too! 🙂


I would like to add more to this post. I feel the explanation given above is still difficult to follow, especially for beginners. So I have decided to give a detailed explanation of the authentic PANNAUPKARI.

Preparing this delicacy requires patience. But as they say, sabr ka phal meeta hota hain. But here…. Sabr ka phal tangy aur spicy hota hain.


The detailed step-by-step procedure begins now

  • Roast the onions, preferably over low flame, until they are browned to perfection. Take care to see that you don’t burn the onions. The browning is a turning point of this authentic dish.
IMG_20150706_215458_wm

At the beginning……

IMG_20150706_221019_wm

Few miuntes later… this is not even half of the expected result

IMG_20150706_221038_wm

Probably 15 minutes later. You feel tired here…. But its not over yet. I did mention that the onions should be browned and its not over yet!

IMG_20150706_221550_wm

And its still not done

IMG_20150706_222127_wm

There they are…… perfectly browned

IMG_20150706_222302_wm

After addition of chilli powder. Be cautious not to burn it in the process . Roast only for 2 minutes under low flame

IMG_20150706_222505_wm

after addition of tamarind and water

IMG_20150706_222834_wm

Add enough water to form a gravy consistency and bring it to a boil

IMG_20150706_222959

Add the fish, cover and cook till done. Till you see the steam coming out through the sides! That would take around 3 minutes as fish gets cooked faster. But do keep checking and see that you dont overcook the fish


BEETROOT UTHAPPA

Not a great fan of beets? Well don’t worry! I ll tell you a yummy method to consume them. What better can it get when you add them grated as a topping to your dosa? Are you still not convinced? Okay then try this once. And I am sure you ll enjoy it totally. This used to be one of our breakfast dishes since childhood and its a hot favourite with everyone. My husband too loved it. And even my little girl relishes it wholeheartedly.

IMG_20141003_204951

RECIPE

INGREDIENTS

URAD DAL- 1 cup

BOMBAY RAWA/SUJI- 2 cups

SALT

You can use a smaller measure if you want to prepare a small quantity.

For three people, you can use 1/2 a cup (measuring 180 ml) of urad. And one whole cup of rawa.

METHOD

1. Wash and soak the urad dal.

2. After 4-5 hours, grind it adding little water.

3. Let the batter be thick and keep it covered overnight for fermentation.

4. Soak rawa in water for just ten minutes. Mix the ground Urad and rawa along with salt.

5. Heat an iron tawa. Add ghee. Spread out a ladle of batter. Let it be thick. Spread grated beetroot over it along with a hint of coriander leaves. Cover the tawa. After a minute, turn over and cook the other side. Serve with coconut chutney.

Its indeed a great breakfast item and a perfect start to your day !

KASHI HALWA (ASH GOURD HALWA)

Kashi Halwa is a traditional dessert, the thought of which itself is so appealing to the taste buds. I loved this as a kid and continue to do so even now. Mom used to make this often and I would be the one to gobble it up first!

I always thought Kashi halwa is tough to prepare as the task could be tedious. It is true but it is worth every spoonful!! Ash gourd was there in the fridge. And I was wondering what to do with it when it suddenly struck me that I should try Kashi halwa. This is my maiden attempt to prepare Kashi halwa, but nonetheless an effort which was worth every minute of preparation.

It is tedious. You need to grate the gourd, keep stirring it with sugar and ghee on a low flame for quite a long time and the end result is so little for the three cups gratings you laboriously made. But like I said, its worth it!

                                                         10633508_10152619399974412_7067742670292715872_o

RECIPE

INGREDIENTS

ASH GOURD – 1kg ( you get around 3 cups when grated, my cup was a regular drinking tumbler 180 ml)

SUGAR – 1.5 cups

GHEE – A little more than half a cup

TURMERIC POWDER – 3/4 tsp

DRY FRUITS – Almonds, cashewnuts and raisins

CARDAMOM PODS – 5-7

PROCEDURE

1. Remove the peel of the gourd and grate it. Use around 3 cups of gratings. And use the same measure or cup for sugar and ghee.

2. Heat a wok and keep stirring the grated gourd. This vegetable releases a lot of water. Hence keep stirring till its dry. Do not stop stirring as it may get burnt. This procedure takes a long time around 20 minutes or more.

3. Once it becomes dry, add the sugar and turmeric powder. Keep stirring till you get a lump. Add the ghee at this juncture, and keep stirring till the ghee has blended well with the halwa.

4. In a seasoning ladle, heat a spoonful of ghee and fry the chopped dryfruits.

5. Garnish the Kashi halwa with dry fruits and crushed cardamom.

PS : Only for your taste buds, definitely not for the calorie conscious 😉

PANEER WITH TOMATO PUREE AND KASURI METHI

Most of us love paneer. I too come in the same league. Being a non vegetarian, my love for paneer is immense. I used to love relishing it along with the spicy gravies in restaurants. Ever since I learnt to cook it well, I prefer my own as I will have a hold on the oil/ghee I add. I usually avoid cashewnut paste and cream owing to the calories that follow. I had jotted down this dish in a hurry few years back as my Mom was preparing it. It can be rightly given a place in my trousseau of recipes. Presenting here paneer with tomato puree and kasuri methi, which is a semidry item. It can be served with roti or rice. IMG_20141125_111227~2_wm

RECIPE

I made a small quantity 100 gm paneer

Garlic around 6-7 flakes finely chopped

Oil 2 tbspn

Jeera 1/2 tsp

Kasuri methi 1 tsp

Tomato puree of two tomatoes – I made the puree from boiled tomatoes…

Tomato sauce just a spoon

Coriander powder 1/2 tsp

Chilli powder – 1/2 tsp

Garam masala – a pinch

Cold milk around 1/4 cup

Salt to taste

Heat oil. Add chopped garlic flakes, cumin seeds. Add tomato puree. Saute properly till oil separates. Add tomato sauce.Then add kasuri methi, chilli and coriander powder and garam masala.Saute. Add paneer. Add the milk accordingly.

JHATPAT ALU

Potatoes are relished by people of all ages in all forms. From starters to main course to even junk food, they only get yummier each time. Presenting this quick potato dish which can be done when you don’t have time for anything elaborate. And it is best had with rice and curd.

This dish is best when served only hot. It comes in handy while you are tired but need home food and lack energy to cook. Don’t pack this in tiffins. It  will lack the punch of how it tastes when served hot. Enjoy!

IMG_20140908_140056

INGREDIENTS

POTATOES – 2 large – boiled, peeled and chopped into cubes

CHILLY  POWDER – 3/4 – 1 tsp ( This actually depends upon your taste)

TURMERIC POWDER – A pinch

ASAFETIDA – the gum form, take a small piece and mix it with little water

OIL –  two tablespoons

CURRY LEAVES

MUSTARD SEEDS

SALT

PROCEDURE

Chop the boiled potatoes into cubes. Apply chilly powder, turmeric, salt and asafetida water to the potatoes evenly and keep aside.

Heat oil in a wok. Add mustard seeds. When they splutter, add curry leaves. Then add the potatoes and keep sauting for around 4-5 minutes till raw smell of powders dissapear. Always remember to serve hot.

TOMATO OMLET

Don’t get confused by the name, as tomato omlet is a pure veggie delight. It is a yummy breakfast item. And what a nice way to eat tomato for those who don t like it raw. It is super easy to prepare, the batter neither requires to be ground nor ferment. So here it goes…….

INGREDIENTS

GREEN CHILLIES    2-3

CORIANDER LEAVES  2 strands

TOMATOES     2 small (finely chopped)

ONIONS          2 small (finely chopped)

MAIDA      1 cup ( my cup/measure is usually a drinking tumbler measuring 175 ml).

ATTA, BOMBAY RAWA, RICE FLOUR  1 cup ( not one cup of each, but roughly fill the cup with mixture of all three)

And for the health conscious, I once did nt have maida at home, so I used 2 cups of mixture of atta, rawa and rice flour skipping the maida. It did turn out well.

Mix with enough water to form a batter consistency. Neither made make it too thick nor too thin.

It goes well with coconut chutney.